
Getting Started with HBook VosFactures
-
Once you’ve subscribed to VosFactures, visit our website to register for the “VosFactures HBook” add-on.
-
You’ll receive a confirmation email containing your license number and a download link. You can also download the ZIP file for the “VosFactures HBook” add-on from the Downloads section of our website.
-
In the Plugins section of your WordPress dashboard, upload the plugin’s ZIP file. Activate it.
-
In HBook > License, validate your license for this plugin.
-
Once enabled, you’ll see a new menu: HBook > E-Invoicing.
Initial Setup on the VosFactures Side
-
Add your company's information to VosFactures > Paramètres > Département/Compagnies. Make a note of the department number; you'll need it for the configuration in HBook VosFactures.
The department number appears in the URL when you edit the department. For example, if the URL is https://mybusiness.vosfactures.fr/departments/1741952/edit, then the department has the ID 1741952.
-
Add your logo in that same menu.
-
Choose the style of your invoice template from VosFactures > Paramètres > Paramètres du compte > Formats (documents, relances, exports)
Configuring HBook VosFactures
You can find the settings for “HBook VosFactures” in the HBook > E-invoicing menu.
In HBook > E-invoicing > Activate e-invoicing services, enable the “VosFactures” service.
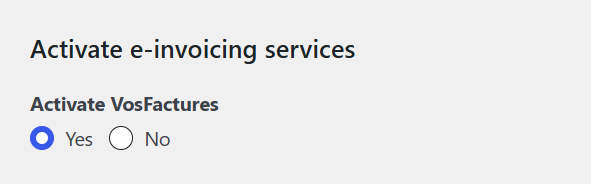
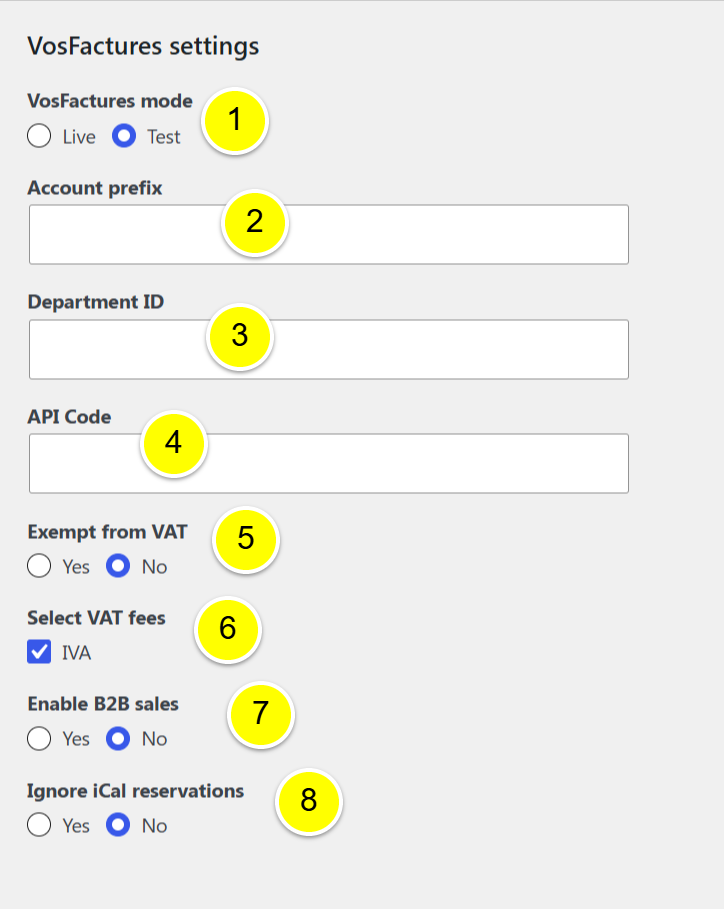
This will show you the settings for the VosFactures service.
-
Select the environment for this service. In “Test” mode, the VosFactures documents created are test documents.
-
Enter the URL prefix for your VosFactures account. This is the first part of the URL when you access your VosFactures account. For example, if the URL is
mycompany.vosfactures.fr, the prefix ismycompany. -
Specify the VosFactures department ID that HBook should use.
If you have different business activities and want to be able to separate your accounting in VosFactures, you’ll need to create different “Departments” in VosFactures. To learn more, read this help article from VosFactures.
-
Enter your API key. You can find it in the Paramètres > API menu from VosFactures.
-
Indicate whether your business is exempt from charging VAT. This will be the case if you are under the “Franchise en base de TVA” regime.
-
If you charge VAT, select the taxes that correspond to VAT from the list of taxes.
-
Indicate whether you sell to businesses. If you only have “Individual” customers, set this option to “No.” If you sometimes have “Business” customers, select “Yes” for this option.
If you bill individuals and professionals, additional fields are required. Please refer to the customer and booking details form section.
-
Indicate whether you do not want invoices to be issued for reservations added to HBook via iCal synchronization.
Reviewing and Editing the Customer Form
Certain fields are required for electronic invoicing. These required fields differ depending on whether you invoice only individuals or also businesses.
When you installed the plugin, additional fields were added to the form that you'll find in HBook > Details Form. You'll see these additional fields added to the end of your form, and by default, they are configured to be neither displayed nor required.
-
In E-invoicing > VosFactures Settings > Invoicing to Businesses, make sure you have specified whether or not you have business customers.
-
In HBook > Details Form, edit the fields as needed.
If you invoice only individuals, the following fields are required: last name, first name, address, ZIP code, and city.
If you also invoice businesses, the following additional fields are required: buyer type, company name, and VAT number.
In the current version of HBook, it is not possible to set a field to be displayed based on the value of another field. Therefore, the “VAT” field will be displayed even if the buyer type is set to “Individual.” We suggest including an explanatory note so that the customer can enter, for example, “not applicable.”